Care LibraryAroids
Roots, Corms and Propagation
July 30, 2026 · 17 min read
Part 4 of 6
The Ultimate Alocasia GuideRoot Systems & Corms in Alocasia
🌱 If you want to truly understand Alocasia - not just keep them alive, but grow them into thriving, statuesque masterpieces - you need to understand what’s happening underground. Root systems and corms are the beating heart of Alocasia growth, survival, reproduction, and recovery. Most plant parents focus on the leaves… but with Alocasia, the real action is happening in the soil. 🌿Understanding the Roots: Thin, Fast, and High-Maintenance🌿 Alocasia roots are very different from thick, woody houseplant roots. They are: Thin and fibrous. Extremely oxygen-hungry. Fast-growing in warm, bright conditions. Quick to rot in cold, wet, or compacted soil. Highly responsive to environmental changes. Why their root structure matters: They need air as much as water Dense soil suffocates them - literally. Without air pockets, roots cannot breathe, and rot sets in fast. They grow and die back seasonally It’s normal for Alocasia to shed some roots during winter or stress periods. They’re built for tropical forest floors Loose leaf litter, decaying wood, and fast-draining substrate shape their natural environment. They root quickly in warm soil!! Warmth = rapid new root growth Cold = root slowdown and rot risk Healthy Alocasia roots look like: Bright white or cream. Firm, not mushy. Spreading outward or downward. Numerous, fine root hairs visible. Unhealthy roots look like: Brown Black Mushy Foul-smelling Hollow or stringy If the roots are unhealthy, the plant cannot drink - leading to drooping, yellowing, pests, and stalled growth. 🌰
Corms: The Powerhouse of the Plant
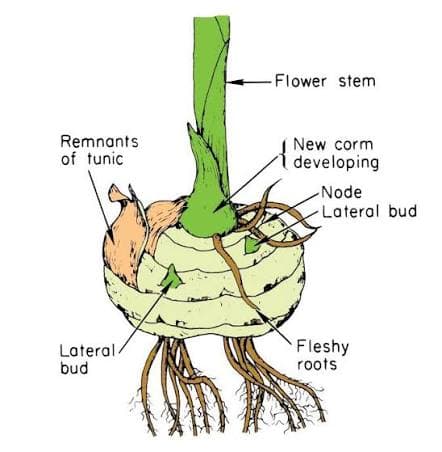
🌰 Corms are the single most misunderstood part of Alocasia biology - and the key to their resilience. Think of a corm as: A storage battery. A life raft. A reproduction chamber. A survival organ. A backup generator. This is why an Alocasia can lose all its leaves and still come back months later! What a corm actually is: A corm is a swollen underground stem that stores: Water Carbohydrates (energy) Nutrients Growth hormones Genetic material Alocasia rely on corms during: Dormancy Stress Under-watering Cold spells Leaf loss Root loss A firm corm = a living plant. A mushy corm = rot and potential plant death. 🌱**Mother Corm vs. Cormlets (Offsets)**🌱 Every mature Alocasia has:
- A central “mother corm” Large, firm, powerful. This is the main storage organ.
- Smaller developing cormlets. These form around the mother corm and eventually become: Pups New plants Propagation candidates Over time, a single Alocasia can produce dozens of cormlets beneath the soil surface.This is one reason repotting can be so rewarding - people often discover a treasure trove of baby corms they had no idea were there. 🐣How Pups Form (The Underground Strategy)🐣 Pups form when: The mother corm has enough stored energy. Conditions are warm and bright. The plant is not under severe stress. The soil is loose enough to allow expansion. The corm sends out lateral growth points, which start as tiny white nubs. These gradually: Form a small cormlet. Begin growing leaf tissue. Push upward through the soil. Emerge as a new baby plant. This process can take: 4–8 weeks in summer. 8–12+ weeks in winter or low light. Even longer in compacted soil. Signs your plant is about to push a pup: New growth from the soil instead of the main stem. Slight soil mound or bump. Increased water intake. New leaf slowdown (energy diverted downward). Not all varieties pup equally. Some, like Dragon Scale, Amazonica, and Odora, pup abundantly. Others, like Melo or Cuprea, are more stingy. 🔁Root & Corm Cycles Through the Seasons🔁 Understanding seasonal cycles makes everything easier: Spring/Summer (Active Growth): New roots form rapidly. Corm swells with energy. Pups form most readily. Soil dries faster. Plant is “building up its reserves”. Fall (Transition Phase): Root growth slows. Corm holds onto energy. Less nutrient transport. Soil stays wet longer. Winter (Dormancy): Roots may partially die back. Corm goes into “survival mode”. Minimal water uptake. Leaf loss may occur. Plant lives off stored energy. This is why watering too much in winter leads to rapid rot. 🧬Why Corms Make Alocasia Surprisingly Resilient🧬 Most houseplants cannot recover from: Full leaf loss. Severe underwatering. Root damage. Being chopped off at the soil line. But Alocasia can - because corms exist!! A healthy corm can resurrect a plant even after: Spider mite infestations. Overwatering incidents. Cold shock. Transport damage. Full dormancy. Being cut back intentionally This is what makes Alocasia propagation so fun (and so forgiving)! 🪴How to Support Root and Corm Health🪴 Use a chunky, well-aerated mix - Corms need oxygen just as much as water. Keep the soil warm - Warm root zones = active growth. Cold soil = rot. Water when the top 1–2 inches dry - This prevents drowning the delicate root hairs. Avoid repotting during winter - Roots are weakest during dormancy. Add beneficial bacteria - Products like EM-1 or Hydroguard help prevent rot. Increase light - More light = more photosynthesis = more corm energy storage. Don’t remove pups too early - Let them grow 3–4 leaves before dividing. 🛠️What to Do if an Alocasia Loses All Its Roots🛠️ This happens more often than people admit - but it is NOT the end. If a plant has no roots: Keep the corm warm. Place in slightly moist sphagnum. Add gentle warmth (heat mat ~75–80°F). Provide bright light. Maintain moderate humidity. Avoid overwatering. You'll often see: New roots in 2–4 weeks. New leaf points in 3–8 weeks. Corms are built to come back!! 🌟The Golden Rule of Roots & Corms🌟 Healthy corm = healthy plant!! If you protect the corm: The roots will regenerate. The leaves will return. The plant will survive stress. Pups will multiply. Growth will resume seasonally. Roots grow from the corm - the corm drives everything! This is why understanding and supporting corm health is the key to mastering Alocasia care. 🌿
Propagation of Alocasia
🌿 Propagating Alocasia is equal parts science, treasure hunt, and magic. Unlike many houseplants that rely on stem cuttings, Alocasia reproduce almost exclusively through corms, pups, and root divisions. These underground growth structures give Alocasia their incredible resilience - and make them surprisingly easy (and very fun!) to propagate once you understand how they work. Propagation is never one-size-fits-all. Different species, different ages, and different seasons influence how easily an Alocasia will produce new plants. This section breaks down every major propagation method, how to do it safely, and when to avoid attempting propagation altogether. 🌱The Three Primary Propagation Methods for Alocasia🌱 See at the very end a bonus section on propagating via pollination
- Separating pups (the easiest and safest)
- Corm propagation (the most fun + the most nerdy)
- Root or rhizome division (best for large, mature plants) Cuttings of leaves or petioles do not work for Alocasia - only methods involving corm tissue are successful. 🐣Propagating Alocasia by Separating Pups🐣 (Beginner-friendly, very reliable, low risk) Pups are baby plants formed from cormlets connected to the mother corm via small root-like structures. When separated correctly, they become instant starter plants. 🌱When to Separate Pups🌱 Timing is everything. Ideal time: Late spring. Summer. Early fall. When temperatures are warm and the plant is actively growing, pups root faster and recover better. Avoid separating pups when: The plant is entering dormancy. The plant is currently stressed (pests, rot, underwatering). It’s winter and the plant has slowed significantly. The mother plant has fewer than 2–3 leaves. Healthy mother = healthy pups. 🌿How to Identify a Pup That’s Ready🌿 A pup is ready to separate when: It has at least 2 leaves and its own root system (look for white roots coming from the base). It’s not too tiny (bigger than a grape is a good rule). The connection to the mother corm is narrow or easily visible. If a pup is still tiny, or tightly fused with the mother corm, waiting a few more weeks is always safer. 🌼**How to Separate a Pup (Step-by-Step)**🌼
- Remove the mother plant from the pot. Be gentle; avoid shaking or tugging.
- Brush away the soil Expose the root ball and corms.
- Locate the pup(s) Find where it attaches to the mother corm.
- Use your fingers first Gently pull apart roots to find the connection point.
- Cut only if necessary Use a sterile knife or scissors to cut the small connector tissue.
- Keep the mother corm intact Never cut into the main corm unnecessarily.
- Pot the pup separately Use a chunky, airy aroid mix or your choice of alternate substrate.
- Provide high humidity + gentle light A grow light and 60–70% humidity helps immensely.
- Keep the soil slightly more moist in the first 1–2 weeks until the pup stabilizes. Pups typically fully root and stabilize within 4–8 weeks. 🌰Propagating Alocasia From Corms🌰 (Intermediate level, extremely fun, very rewarding) Corm propagation is the plant nerd equivalent of uncovering buried treasure. When you unpot an Alocasia, you may find: Tiny white cormlets the size of peas Larger corms the size of marbles Even big thumb-sized corms All of them can become new plants. 🔍How to Identify a Viable Corm🔍 A viable corm is: Firm. Smooth or slightly textured. Beige, white, brown, or tan. Not mushy. Not hollow. Not blackened or slimy. If it’s squishy or smells foul — discard it. If it’s firm, it will sprout (sometimes this can take months!) 🌿Three Primary Methods for Corm Propagation🌿 Below are the most common and successful techniques plant parents use. ⭐ Method 1: (Semi-Hydro Method and our preferred method) 50/50 Perlite/ Fluval Stratum Propagation Method Why this works: Great for preventing rot High airflow Low chances of fungal issues Easy to maintain consistent moisture How to do it:
- Acquire a "self-watering corm cup" (these can be bought or made) Check out the ones that we provide on our Palm Street lives and shop!!
- Add your normal fertilized water mix to the "water reservoir" part (bottom) of the setup.
- Ensure that the wick (cotton string) is installed in the hole in the middle of the tray.
- Fill the tray (the part where the corm will ultimately be placed) with the 50/50 mixture.
- Wet down the 50/50 mixture with the same water mixture that you filled the water reservoir with.
- Place the corm, attachment side down into the 50/50 mixturethe the top 25% - 50% out of the mixture. This method is extremely rot-resistant and great for enthusiasts of every level. Method 2: Sphagnum Moss Method Why it works: Moss holds moisture. High airflow prevents rot. Perfect humidity for sprouting. How to do it:
- Hydrate long-fiber sphagnum until damp (not dripping).
- Place corm on top of moss or gently nestle it halfway.
- Use a shallow container or propagation box.
- Keep warm — 75–85°F is ideal.
- Provide bright light (grow light is perfect).
- Keep moss moist, not wet When to expect growth (on average): First root: 2–6 weeks. First leaf point: 4–10 weeks. Some species sprout faster than others and some are much much slower. Method 3: Water Propagation (In our opinion this is riskier but can be very effective for larger corms) Best used for: Big corms. Corms with visible growth points. How to do it: Place the corm in shallow water (¼–½ inch). Change water every few days. Keep warm and under a grow light. Move to soil or moss once roots reach ½–1 inch. This method provides fast sprouting, but can rot if water is stagnant or too deep. 🌱How to Pot Up Sprouted Corms🌱 When your corm sprouts: It will form roots first. Then a tiny, spear-shaped leaf point. Then its first baby leaf. Pot the corm at the very earliest when: (NOTE: This is the VERY EARLIEST and we generally leave ours in the corm cups much longer) Roots are at least ½ inch long. The sprout looks stable. The first leaf is emerging or about to appear. Use: A small pot (too big = rot risk). A well-draining aroid mix or your preferred substrate. High humidity (but not soaked soil). Steady warmth. Expect slow growth at first - the plant is establishing root structure. 🔁Propagating by Root Division🔁 This method works best for large, mature Alocasia. How to divide: Unpot the plant. Look for natural separations in the root mass. Only divide when each section has: A chunk of corm. A few roots. At least one growth point. This works especially well with:
- Odora
- Macrorrhiza
- Regal Shield
- Portora But is rarely used for delicate species like Melo or Cuprea. 🧬Species Differences in Propagation🧬 Some Alocasia are “pup or corm factories.” Others… not so much. Heavy pup producer examples:
- Amazonica (Polly)
- Odora
- Macrorrhiza
- Dragon Scale
- Regal Shield Moderate pup producer examples:
- Frydek
- Silver Dragon
- Yucatan Princess Rarely pup or slow grow examples:
- Melo
- Cuprea
- Black Velvet
- Low-level species hybrids These often rely more on corm propagation than pup production. 🧪Common Propagation Mistakes (and How to Avoid Them)🧪 ❌Overwatering new pups Roots are fragile - keep soil lightly moist. ❌Using soil that’s too dense Remember: oxygen is life for roots. ❌Separating pups too early Small pups die easily when removed too soon. ❌Propagating during winter dormancy Low temps + low light = rot. ❌Burying corms too deep Corms need air even while sprouting. ❌Not providing warmth Propagation thrives at 75–85°F. 🌟The Golden Rule of Alocasia Propagation🌟 Warmth + Bright Light + Moist Airflow = Successful Propagation. If you give your corms and pups: Warm soil. Elevated humidity. Bright, indirect light. Chunky, breathable substrate. Consistent but careful watering. They will sprout, root, grow, and multiply - sometimes faster than you expect (and sometimes MUCH slower). Alocasia are natural survivors and natural reproducers. Once you master their corms, propagation becomes one of the most satisfying parts of keeping them. 🌿Root Health & Up-Potting🌿 Alocasia roots are delicate, sensitive, and incredibly important — they’re the first part of the plant to react to environmental changes, and often the earliest indicator that something is wrong. Healthy roots mean healthy leaves, steady growth, and fewer pests. Unhealthy roots lead to nearly every problem Alocasia owners experience, from yellowing leaves to sudden dormancy or rot. Understanding what healthy roots look like, how they grow, and how to up-pot properly is essential for long-term Alocasia success. 🌱Understanding Alocasia Root Behavior🌱 Alocasia root systems are unique compared to many houseplants. They are: Thin and fibrous (great at absorbing water, but easy to damage). Fast-growing in warm seasons. Slow or stalled in cold seasons. Extremely oxygen-dependent. Highly responsive to light, temperature, and moisture. Because of these traits, Alocasia roots thrive when the environment is stable — and react dramatically when it’s not. Healthy Alocasia roots will: Be white, cream, or lightly tan. Feel firm and flexible. Spread evenly through the soil. Smell earthy, not sour. Regrow rapidly in warm, bright conditions. Unhealthy roots will: Be brown, black, or translucent. Feel mushy, slimy, or stringy. Come off easily when tugged. Smell sour or rotten. Stop absorbing water, causing leaves to droop even right after watering. When roots struggle, the entire plant suffers - especially the corm. 🍂Common Root Stress Mistakes🍂 These are the most frequent causes of root decline:
- Overwatering + Dense Soil - The fastest way to rot the root system: No airflow. Anaerobic (oxygen-poor) conditions. Bacterial rot.
- Cold Soil Roots essentially shut down under ~60°F (15°C). Cold + wet = rot
- Underwatering (Repeat Cycles) Leads to: Shriveling of root hairs. Hydrophobic soil. Stunted growth.
- Oversized Pots Too much soil = too much moisture retention. This along with dense soil is one of the top causes of Alocasia root rot.
- Disturbing Roots in Dormancy Winter root systems are fragile and easily damaged. 🌿The Root Zone: Where Plant Health Begins🌿 Alocasia root health depends on three things:
- Airflow (oxygen) Chunky, aerated soil prevents rot.
- Moisture balance Consistent moisture - not soggy, not bone-dry.
- Warmth Roots grow far faster above 70°F. When these three needs are met, roots flourish. 🪴Signs Your Alocasia Is Ready to Up-Pot🪴 Alocasia prefer to be slightly snug in their pots. They do not appreciate having too much space — it leads to wet soil pockets and root suffocation. Only up-pot when necessary. Your Alocasia is ready to move up a pot size if: Roots are circling the bottom. Visible through drainage holes. Soil dries out extremely fast (1–2 days). Indicates roots are taking up most of the pot. The plant becomes top-heavy. Pot tips over when touched. Multiple pups crowd the space. Two or more pups pressing against the pot walls. The mother corm is pressing up against the pot side. New growth is being inhibited. Smaller leaves than normal. You see roots growing upward toward the soil surface seeking oxygen. If none of these signs are present, your plant is not ready to up-pot. ⚠️When NOT to Up-Pot⚠️ Avoid up-potting in these situations: Winter or dormancy. (Roots aren’t actively growing and won’t recover from disturbance) After leaf loss or stress. (Give the corm time to stabilize) If soil is already staying wet for too long. (Fix the soil, not the pot size) After a pest infestation (Treat pests first) Up-potting at the wrong time is a major cause of plant decline. 🪴**How Much Bigger Should the Next Pot Be?🪴 This is critical: Only size up by 1–2 inches diameter. Examples: 4-inch pot - move to 5–6 inch 6-inch pot - move to 7–8 inch Anything larger can cause: Soil staying wet too long. Root rot. Dormancy triggered by root shock. Sudden leaf loss. Alocasia prefer gradual steps, not giant leaps. 🌱The Up-Potting Process (Step-by-Step)**🌱 Here is a gentle, safe method that prevents root shock:
- Choose the Right Soil See our substrate recipes above in the Soil Section.
- Very Lightly Water the Day Before Slightly moist soil helps roots slide out gently. Do not up-pot when bone-dry or soaking wet.
- Remove the Plant Carefully Hold the base, squeeze the pot if plastic, tilt, and slide out. Never pull on the leaves or stems.
- Inspect the Roots Look for: White/cream roots = healthy Mushy brown roots = rot Dry shriveled roots = past underwatering If rot is present: Trim mushy sections with sterile scissors. Rinse lightly if needed. Apply cinnamon or fungicide (optional)
- Place in the New Pot (we recommend self-watering pots) Add fresh substrate to the bottom so the corm sits at the same height as before. Do NOT bury the corm too deep. Position the plant in the center (make sure to position the roots in an umbrella shape with the corm in the center) and fill in gently with the new mix.
- Lightly Water In Just enough to settle the soil around the roots.
- Provide Warmth + Bright Light The “recovery formula” after up-potting: Warm air (70–80°F). Good light (grow lights are perfect). Moderate humidity (50–70%). Avoid: Direct sun. Cold air. Overwatering. New roots will begin exploring the fresh soil within 1–3 weeks. 🌱How to Handle Root-Bound Alocasia🌱 If your Alocasia is very root bound: Gently loosen the bottom roots. Do not aggressively tear the root mass. Remove as much of the old soil as possible if it is at all compacted. Maintain root integrity as much as possible (remember: Alocasia tend to have fragile root systems). Alocasia recover best from gentle handling. 🌰How Up-Potting Affects the Corm🌰 The corm responds to up-potting by: Expanding root production. Increasing water uptake. Preparing for larger leaves. Sometimes initiating new pups. This is why repotting in spring often leads to a flush of new growth. But if the pot is too large, the corm becomes stressed, not stimulated. 🧪Signs Your Plant Is Recovering Well After Up-Potting🧪 Your Alocasia should show: A new leaf forming within 4–8 weeks. Stronger petioles. Steady soil drying pattern. Increased water intake. No yellowing. Pups forming (optional but exciting). If the plant stalls or wilts, check: Light. Temperature. Soil moisture. Pot size. Often the issue is simply watering too much or substrate issues after repotting. 🌟The Golden Rule of Root Health & Up-Potting🌟 Only disturb roots when they are actively growing. If roots are thriving in warm weather + bright light, the plant will bounce back quickly. If roots are cold, stressed, or dormant, any disturbance risks rot or leaf loss. If You Give Alocasia: Chunky soil. Proper pot size. Warmth. Consistent moisture. Bright light. The roots will thrive - leading to bigger, healthier plants from the ground up. 🐛🌿